

The National Payments Corporation of India (NPCI) created the Unified Payments Interface (UPI), a payment transfer system that allows Indian residents to immediately move money from one bank account to another via a UPI-compatible application. The UPI payment system has gained a lot of traction since it was introduced in 2016 as a means of transferring and receiving money. This is mostly because of its constant accessibility, smooth transactions, and simplicity of use. However, there are methods you can use to quickly replace or reset your UPI PIN if you forget it.
You must to register on a UPI-enabled app, such as Google Pay, Paytm, PhonePe, Amazon Pay, BHIM, etc., so on, by linking your bank account, in order to take advantage of UPI technology. Yet, The app will require you to create a UPI PIN upon registration.
However, A four-or six-digit personal identification number known as a UPI PIN must be entered each time a transaction is started. The UPI PIN must be kept private and must not be shared by users, as this is the final authentication step before a transaction.
Change UPI PIN in Google Pay
Google Pay is just one of the many apps that accept UPI payments. However, Steps to change your UPI PIN:
- Launch the Google Pay application.
- Select your profile photo by tapping on it in the top-right corner.
- Under the Setup payment methods section, select “Bank account.”
- Choose the bank account that is set up for UPI payments.
- However, Select Change UPI PIN from the triple-dot menu icon in the top-right corner.
- Enter your previous UPI PIN on the following screen.
- After that, enter a new four-digit UPI PIN. Although, Enter it again for verification.
Reset PIN in Google Pay
If you have forgotten your UPI PIN, follow the instructions in the Google Pay app to reset it.
- Launch the Google Pay application.
- Select your profile photo by tapping on it in the top-right corner.
- Under the Setup payment methods section, Although, select “Bank account.”
- Choose the bank account that is set up for UPI payments.
- Select “Forget UPI PIN.”
- On the next screen, enter the last six digits of your debit card number as well as the expiry date.
- Enter a new UPI PIN and the OTP you’ll receive via SMS.
How to Change UPI PIN in Paytm
Paytm is another popular platform that accepts UPI payments. Although, Here’s what you need to do if you want to change your UPI PIN via the Paytm app.
1. Launch the “PayTM” app.
2. Tap the “profile” icon located in the top-left corner.

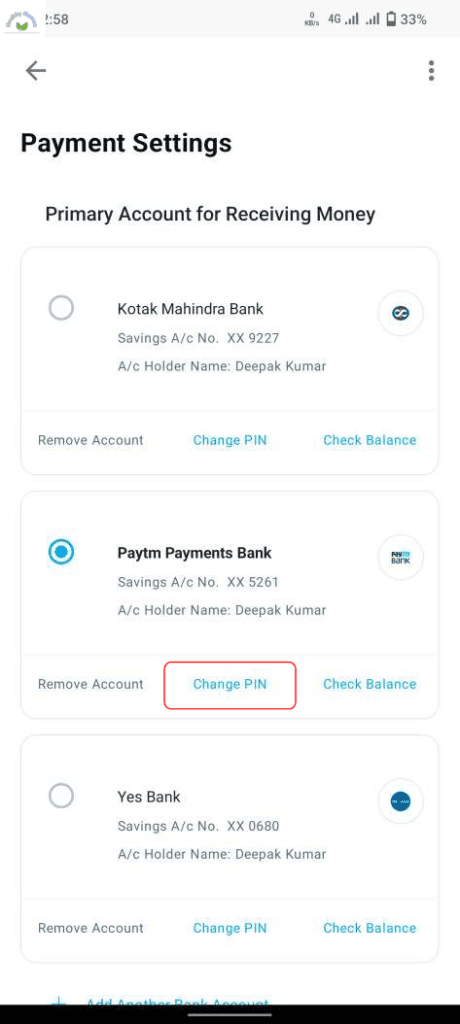
3. Navigate to Payment Settings.
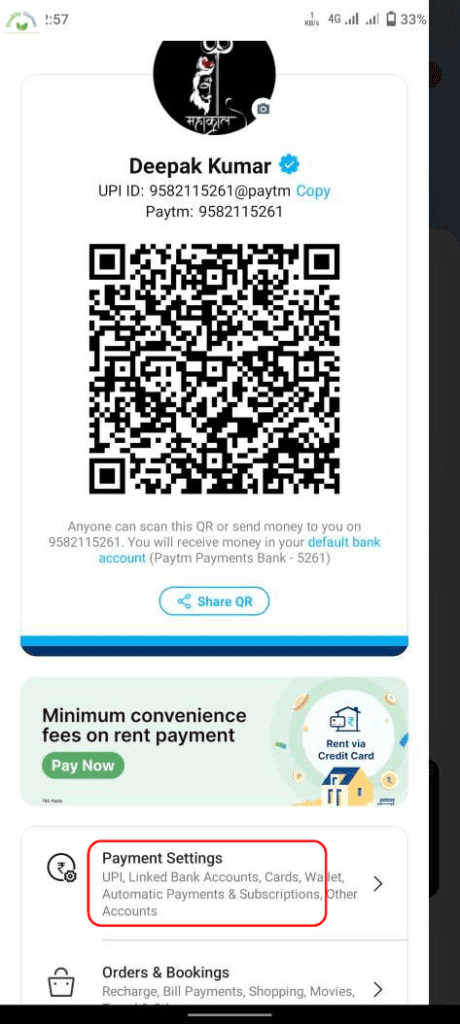
4. Select UPI & Linked Bank Accounts from the menu.
5. Under your linked bank account, tap Change PIN.
6. Choose “I remember my previous UPI PIN.”

7. Enter your previous UPI PIN, leading to a new four-digit PIN.
8. Re-enter the PIN and click “Confirm.”
Reset UPI PIN in Paytm
Although, Here’s how you can generate a new UPI PIN using the PayTM app.
1. Launch the “PayTM” app.
2. Tap the “profile” icon located in the top-left corner.
3. Go to Payment Settings.
4. Select UPI and Linked Bank Accounts.
5. Select “Change PIN” from your linked bank account.
6. Enter the last six digits of your debit card number, as well as the expiration date.
7. Create a new UPI PIN and enter the OTP received via SMS.
How to Change UPI PIN in PhonePe
You can change your PhonePe UPI PIN by following the simple steps listed below.
1. Start the PhonePe App on your internet-enabled Android, iOS, or Windows smartphone.
2. Click on the menu icon for the app, however, which is represented by three dots in the top right corner of your phone’s screen.
3. Select “Bank Accounts” from the drop-down menu. Although, All of your bank accounts that are linked to the PhonePe UPI Payment App can be found here.
4. Select the bank account for which you want to change or reset the UPI pin.
5. When you select a bank account, you will be presented with the “SET” and “RESET” options. You’d have used the former when creating your account. However, because you need to change your PhonePe PIN, you must choose “Reset.”
6. The next step in resetting your UPI PIN in PhonePe is to enter your debit card’s last six digits as well as the card’s expiry date in MM/YY format. Although, account-holders who have virtual debit cards with no expiry date can enter the standard PhonePe code, 00/49, as the expiry date.
7. PhonePe will send you a One-Time Password (OTP) to your registered mobile number, which you will need to enter in order to set up your new PhonePe UPI PIN.
8. After entering the OTP, tap on submit to set your new PIN and confirm it by entering it again.
How to Reset UPI PIN in PhonePe
However, In the PhonePe app, follow the instructions to reset your UPI PIN.
1. Launch the Phonepe app.
2. In the top-left corner of the screen, tap on your profile.
3. Choose your bank account as the payment method.
4. Press the “Reset” button.
5. Enter your credit card information.
6. Enter the OTP as well as the new UPI pin.
Your UPI pin has been successfully set up. However, If you want to change your pin in the future, follow the same steps.
Amazon Pay UPI PIN Reset Instructions
Reset your UPI PIN by following the instructions in the Amazon Pay app.
1. Open the Amazon mobile app and select “Amazon Pay.”
2. Select “Amazon Pay UPI.”
3. Locate your bank account by swiping down.
4. Click Forget UPI PIN.
5. Enter the expiration date and the last six digits of your debit card number.
6. Type in a brand-new 4-digit UPI PIN.
Know the actual reasons behind linking credit cards with UPI
Conclusion
The National Payments Corporation of India created the Unified Payments Interface (UPI), it was introduced in 2016. Although, Several of the UPI-compatible apps allow you to reset or modify your UPI PIN in the manner described above. However, It’s crucial to remember that the UPI PIN will be the same for all UPI apps. Although, The UPI PIN you change in one app can be used in other UPI-enabled apps as well.
Also Read: How to Cancel Discovery Plus